Steps and Sample to connect Kerberosed Hive form Local Windows desktop/laptop

Follow following steps to connect Kerberosed Hive form Local Windows desktop/laptop:

  1. Install MIT Kerberos Distribution software from “http://web.mit.edu/kerberos/dist/”
  2. Configure  winutils.exe for Hadoop connection from “https://github.com/steveloughran/winutils/tree/master/hadoop-2.7.1/bin”
  3. Set up the Kerberos configuration file in the default location.
    • Obtain a krb5.conf configuration file from your Kerberos cluster default location in Hadoop cluster (/etc/krb5.conf).
    • The default location is C:\ProgramData\MIT\Kerberos5. This directory may be hidden by the Windows operating system. So enable hidden file viewing..
    • Rename the configuration file from krb5.conf to krb5.ini.
    • Copy krb5.ini to the default location and overwrite the empty sample file.
  4. Set up the Kerberos credential cache file.
    • Create a writable directory. For example, C:\temp
    • Create environment variable KRB5CCNAME and Enter variable value: <writable directory from step 1>\krb5cache. For example, C:\temp\krb5cache
  5. Copy winutils to local env as bin folder containing winutils.exe sample: C:\winutils\bin\winutils.exe
  6. Gather and set below information in the sample or wm configuration  files:

userPrincipalName = “user@REALAM.COM”;

keytabPath = “C:/users/user/user.keytab”;

kdcHost = “kdc.host.com”;

releam = “REALAM.COM”;

winUtilHome = “C:\\winutils\\”;


#####################################################################

Code Sample :

import java.sql.Connection;

import java.sql.DriverManager;

import java.sql.ResultSet;

import java.sql.ResultSetMetaData;

import java.sql.SQLException;

import java.sql.Statement;


import org.apache.hadoop.conf.Configuration;

import org.apache.hadoop.security.UserGroupInformation;


public class KerborsedJDBCSample {


public static void main(String[] args) {

String userPrincipalName = “user@REALAM.COM”;

String keytabPath = “C:/users/user/user.keytab”;


String jdbcURL = “jdbc:hive2://{hostName}:{port}/{databaseName}”;

String hivePrinicipal = “principal=hive/{hostName}@{releam}”;

Boolean isKerberosed = true;

String kdcHost = “kdc.host.com”;

String hiveHost = “hive.host.com”;

String hiveDatabase = “testdb”;

String hiveDriverClass = “org.apache.hive.jdbc.HiveDriver”;

String hiveUserName = “user”;

String hivePassword = “adasdas”;

Integer hivePort = 10000;

String releam = “REALAM.COM”;

String winUtilHome = “C:\\winutils\\”;

String query=”select * from temptable limit 10″;

jdbcSample(userPrincipalName, keytabPath, jdbcURL, hivePrinicipal, isKerberosed, kdcHost, hiveHost,hiveDatabase, hiveDriverClass, hiveUserName, hivePassword, hivePort, releam, winUtilHome, query);

}


private static void jdbcSample(String userPrincipalName, String keytabPath, String jdbcURL, String hivePrinicipal,

Boolean isKerberosed, String kdcHost, String hiveHost, String hiveDatabase, String hiveDriverClass,

String hiveUserName, String hivePassword, Integer hivePort, String releam, String winUtilHome,

String query) {

if (isKerberosed) {

System.setProperty(“hadoop.home.dir”, winUtilHome);

System.setProperty(“java.security.krb5.realm”, releam);

System.setProperty(“java.security.krb5.kdc”, kdcHost);

jdbcURL = jdbcURL + “;” + hivePrinicipal;

loginViaKeyTab(userPrincipalName, keytabPath);


}


jdbcURL = jdbcURL.replaceAll(“\\{hostName\\}”, hiveHost).replaceAll(“\\{port\\}”, “” + hivePort)

.replaceAll(“\\{databaseName\\}”, hiveDatabase).replaceAll(“\\{releam\\}”, releam);

Connection connection=null;

Statement statement=null;

ResultSet rs=null;

try {

Class.forName(hiveDriverClass);

connection = DriverManager.getConnection(jdbcURL, hiveUserName, hivePassword);

statement = connection.createStatement();

rs = statement.executeQuery(query);

ResultSetMetaData rsmd = rs.getMetaData();

int columnsNumber = rsmd.getColumnCount();


while (rs.next()) {

for(int i = 1 ; i <= columnsNumber; i++){


System.out.print(rs.getString(i) + ” “);


}

System.out.println();


}


} catch (Exception e) {

// TODO Auto-generated catch block

e.printStackTrace();

}finally {

try {

rs.close();

statement.close();

connection.close();


} catch (SQLException e) {

// TODO Auto-generated catch block

e.printStackTrace();

}

}

}


public static void loginViaKeyTab(String principalName, String keytabPath) {


try {

Configuration conf = new Configuration();

conf.set(“hadoop.security.authentication”, “Kerberos”);

UserGroupInformation.setConfiguration(conf);

UserGroupInformation.loginUserFromKeytab(principalName, keytabPath);

} catch (Exception e) {

e.printStackTrace();

}


}


}

Posted in Uncategorized | Tagged , | Leave a comment

Configuring Transparent Proxy Server on AWS VPC NAT instance for Controlled Access to the S3 bucket / Specific URL

Goal:We use S3 bucket for storing sensitive data in and process it on EC2 instances, located in the private subnet of the private/public VPC. To control access on account/user s3 bucket we set up S3 buckets policy by IP and user(iam) arn’s thus i consider that data in s3 bucket is ‘on the safe side’. But Issue with this approach is private subnet VM should be able to access only the specific/user S3 bucket which is not directly possible with AWS Security group and Network ACL configuration.This problem actually leads to a big Security leak i.e user  uploads malware application/simple curl command  on ec2 instance and during processing data executes malware application/Curl Command that transfer data to other(unauthorized)  S3 buckets under different AWS account.
To avoid this security leak we need to disable uploading data to ec2-instance to any other S3 bucket/ HTTPS urls.

Problem: is it possible to restrict access on vpc firewal in such way that it will be access to some specific s3 buckets but it will be denied access to any other buckets? Assumed that user might upload malware application to ec2 instance and within it upload data to other buckets(under third-party AWS account).

“To solve this problem i spent hell allot of time because of the partial information available on the internet source. Then thought of writing a blog to configure it so that Geek around the world not face Same problem.”

Possible Solution: We should configure Transparent HTTP/HTTPS proxy server which will do URL filtering for all the outgoing request going from the private Subnet to internet world. So solution seems very easy right  so before going into that let understand what are the hell these proxy server and AWS Private-Public VPC and NAT:

VPC with Public and Private Subnets:

This VPC configuration for a virtual private cloud (VPC) with a public subnet and a private subnet. This is recommended to the scenario if you want to run a public-facing web application, while maintaining back-end servers that aren’t publicly accessible. A common example is a multi-tier website, with the web servers in a public subnet and the database servers in a private subnet. You can set up security and routing so that the web servers can communicate with the database servers.

The instances in the public subnet can receive inbound traffic directly from the Internet, whereas the instances in the private subnet can’t. The instances in the public subnet can send outbound traffic directly to the Internet, whereas the instances in the private subnet can’t. Instead, the instances in the private subnet can access the Internet by using a network address translation (NAT) instance that you launch into the public subnet.

(More information ) http://docs.aws.amazon.com/AmazonVPC/latest/UserGuide/VPC_Scenario2.html

http://docs.aws.amazon.com/AmazonVPC/latest/UserGuide/VPC_NAT_Instance.html

What is a Proxy Server?

A Proxy server is an intermediary machine, between a client and the actual server, which is used to filter or cache requests made by the client.

Normal (Regular/Caching) Proxy:

A regular caching proxy server is a server which listens on a separate port (e.g. 3128) and the clients (browsers) are configured to send requests for connectivity to that port. So the proxy server receives the request, fetches the content and stores a copy for future use. So next time when another client requests for the same webpage the proxy server just replies to the request with the content in its cache thus improving the overall request-reply speed.

Transparent Proxy:

A transparent proxy server is also a caching server but the server is configured in such a way that it eliminates the client side (browser side) configuration. Typically the proxy server resides on the gateway and intercepts the WWW requests (port 80, 443 etc.) from the clients and fetches the content for the first time and subsequently replies from its local cache. The name Transparent is due to the fact that the client doesn’t know that there is a proxy server which mediates their requests. Transparent proxy servers are mostly used in big corporate organizations where the client side configuration is not easy (due to the number of clients). This type of server is also used in ISP’s to reduce the load on the bandwidth usage.

Reverse Proxy:

A reverse proxy is totally different in its usage because it is used for the benefit of the web server rather than its clients. Basically a reverse proxy is on the web server end which will cache all the static answers from the web server and reply to the clients from its cache to reduce the load on the web server. This type of setup is also known as Web Server Acceleration.

References:

http://en.wikipedia.org/wiki/Proxy_server

http://www.webupd8.org/2010/02/differences-between-3-types-of-proxy.html


Solution/Approach:

Since we understood that in the VPC with Private  and Public AWS automatically send the all the outgoing request  for the internet sources generated from the private Subnet to the NAT instance. So we need to configure our proxy server solution on the NAT instance itself. If you are manually provisioning the AWS VPC then you need to configure proxy server after NAT instance is ready. What if want to remove this manual configuration then you can Create a AMI  for the NAT instance and use that AMI for NAT instance to setup with  cloudformation template for the VPC with private public subnet.

We will be using Squid as Proxy server for filtering HTTP and HTTPS url (http://www.squid-cache.org/). We will configure NAT instance to use Squid as transparent proxy server for the http and https urls.

Squid work fine as transparent proxy server for the HTTP urls but it does not work for the HTTPS because of the following reason.

Why HTTPS filtering exclusions do not work when Squid intercepts HTTPS connections transparently? If your Squid proxy is configured to transparently intercept and decrypt HTTPS connections, then HTTPS domain name exclusions shown in the Squid URL filtering cannot be done. The reason for this is simple – domain name is not available at the time when Squid need to decide whether to decrypt the HTTPS connection or not. Only IP addresses of client and server are available. Domain name becomes available only after HTTPS decryption.

So  configure Squid transparent proxy serve for the HTTP request and normal plain https proxy server for the https urls so that we can support https url filtering as well. But we will configure NAT instance firewall iptable route to send all the internet request generated from private sub-net to pass through Squid get blocked if proxy setting are not used.

Follow Below steps to configure SQUID on NAT:

 Steps for Configuring Custom NAT instance AMI and Install Squid Proxy Server:

1. Launch  EC2 instance using  Amazon Linux AMI (64-bit) AMI from the market place (Note that for the NAT instance custom AMI you only need use Amazon Linux AMI with other linux falvor AMI doesn’t work as it NAT instance AMI ).

2.  Login to the Ec2 instance and copy /usr/local/sbin/configure-pat.sh for the exiting NAT instance you have or copy below content and create a file in /usr/local/sbin/configure-pat.sh.


#!/bin/bash

# Configure the instance to run as a Port Address Translator (PAT) to provide
# Internet connectivity to private instances.
#

set -x
echo “Determining the MAC address on eth0”
ETH0_MAC=`/sbin/ifconfig | /bin/grep eth0 | awk ‘{print tolower($5)}’ | grep ‘^[0-9a-f]\{2\}\(:[0-9a-f]\{2\}\)\{5\}$’`
if [ $? -ne 0 ] ; then
echo “Unable to determine MAC address on eth0” | logger -t “ec2”
exit 1
fi
echo “Found MAC: ${ETH0_MAC} on eth0” | logger -t “ec2”
VPC_CIDR_URI=”http://169.254.169.254/latest/meta-data/network/interfaces/macs/${ETH0_MAC}/vpc-ipv4-cidr-block”
echo “Metadata location for vpc ipv4 range: ${VPC_CIDR_URI}” | logger -t “ec2”
VPC_CIDR_RANGE=`curl –retry 3 –retry-delay 0 –silent –fail ${VPC_CIDR_URI}`
if [ $? -ne 0 ] ; then
echo “Unable to retrive VPC CIDR range from meta-data. Using 0.0.0.0/0 instead. PAT may not function correctly” | logger -t “ec2”
VPC_CIDR_RANGE=”0.0.0.0/0″
else
echo “Retrived the VPC CIDR range: ${VPC_CIDR_RANGE} from meta-data” |logger -t “ec2”
fi

echo 1 > /proc/sys/net/ipv4/ip_forward && \
echo 0 > /proc/sys/net/ipv4/conf/eth0/send_redirects && \
/sbin/iptables -t nat -A POSTROUTING -o eth0 -s ${VPC_CIDR_RANGE} -j MASQUERADE

if [ $? -ne 0 ] ; then
echo “Configuration of PAT failed” | logger -t “ec2”
exit 0
fi
echo “Configuration of PAT complete” |logger -t “ec2”
exit 0


 3.  Run following steps to make it executable and run at system boot time:

chmod +x /usr/local/sbin/configure-pat.sh

Add  following entry in the /etc/rc.local at end:

/usr/local/sbin/configure-pat.sh

4.  Follow following steps to configure Squid Amazon Linux AMI (64-bit) AMI comes with its own OPEN SSL package which is not compatible with SQUID.

4.1 Configure and install OpenSSL from source

yum update
yum install wget
wget http://www.openssl.org/source/openssl-1.0.0o.tar.gz
tar -zxvf openssl-1.0.0o.tar.gz
cd openssl-1.0.0o
./config shared –prefix=/opt/squid/openssl –openssldir=/opt/squid/openssl
make
make install
mv /usr/bin/openssl /usr/bin/openssl_back
echo “/opt/squid/openssl/lib” >> /etc/ld.so.conf
ldconfig
cd

Add following line the /etc/profile file
export LD_LIBRARY_PATH=$LD_LIBRARY_PATH:/opt/squid/openssl/lib/
export PATH=$PATH:/opt/squid/openssl/bin/
source /etc/profile

4.2 Build and install Squid

yum install -y perl gcc autoconf automake make sudo wget gcc-c++
yum install -y libxml2-devel libcap-devel
yum install -y libtool-ltdl-devel
yum install -y glibc-static glibc
yum install -y libstdc++-devel* g++
wget http://www.squid-cache.org/Versions/v3/3.4/squid-3.4.9-20141031-r13187.tar.gz
tar -zxvf squid-3.4.9-20141031-r13187.tar.gz
cd squid-3.4.9-20141031-r13187
./configure –enable-ssl-crtd –enable-ssl –prefix=/usr –includedir=/usr/include –datadir=/usr/share –bindir=/usr/sbin –libexecdir=/usr/lib/squid –localstatedir=/var –sysconfdir=/etc/squid –with-openssl=/opt/squid/openssl
make
make install
mkdir -p /var/lib/ssl_db
cd /usr/lib/squid/
./ssl_crtd -c -s /var/lib/ssl_db
squid -z

5. Configure  Squid as Transparent Http proxy  Copy following configuration for configuring Squid transparent proxy server:

# Put yours bucket DNS comma separated to enbale only selected Bucket of you enviroment
acl aws_bucket dstdomain mybucket.s3.amazonaws.com
# VPC CDIR (10.0.0.0/16) you need to change it according to your VPC CDIR
acl localnetsrc src 10.0.0.0/16
# VPC CDIR(10.0.0.0/16) you need to change it according to your VPC CDIR
acl localnetdst dst 10.0.0.0/16
acl SSL_ports port 443
acl Safe_ports port 80 # http
acl Safe_ports port 21 # ftp
acl Safe_ports port 443 # https
acl Safe_ports port 70 # gopher
acl Safe_ports port 210 # wais
acl Safe_ports port 1025-65535 # unregistered ports
acl Safe_ports port 280 # http-mgmt
acl Safe_ports port 488 # gss-http
acl Safe_ports port 591 # filemaker
acl Safe_ports port 777 # multiling http
acl CONNECT method CONNECT
http_access deny !Safe_ports
http_access deny CONNECT !SSL_ports

# Only allow cachemgr access from localhost
http_access allow localhost manager
http_access deny manager
http_access allow localnetsrc localnetdst
http_access allow localnetsrc aws_bucket
#http_access allow localnetsrc
#http_access allow localnetdst
# And finally deny all other access to this proxy
http_access deny all
# ssl-bump settings managed by Diladele Web Safety for Squid Proxy
sslproxy_cert_error allow aws_bucket
sslproxy_cert_error deny all
ssl_bump none localhost
ssl_bump none localnetsrc
ssl_bump none localnetdst
ssl_bump server-first aws_bucket
#ssl_bump none all
#ssl_bump none all
# configure ports
http_port 3127
#configured http proxy as transparent
http_port 3128 intercept
#configured https proxy as plain https proxy to support https url filtering.
http_port 3129 ssl-bump generate-host-certificates=on dynamic_cert_mem_cache_size=4MB cert=/etc/squid/ssl/squidCA.pem
# configure path to ssl cache
sslcrtd_program /usr/lib/squid/ssl_crtd -s /var/lib/ssl_db -M 4MB
# Uncomment and adjust the following to add a disk cache directory.
#cache_dir ufs /var/cache/squid 100 16 256
# Leave coredumps in the first cache dir
coredump_dir /var/cache/squid
#
refresh_pattern ^ftp: 1440 20% 10080
refresh_pattern ^gopher: 1440 0% 1440
refresh_pattern -i (/cgi-bin/|\?) 0 0% 0
refresh_pattern . 0 20% 4320

6. Run following IPtables commands on NAT to open proxy port and configure tranparent proxy setting:

sudo /sbin/iptables -t nat -A PREROUTING -i eth0 -p tcp -m tcp –dport 80 -j REDIRECT –to-ports 3128
sudo /sbin/iptables -t nat -A PREROUTING -i eth0 -p tcp -m tcp –dport 443 -j REDIRECT –to-ports 3129
sudo /sbin/iptables -I INPUT 1 -p tcp –dport 3127 -j ACCEPT
sudo /sbin/iptables -I INPUT 1 -p tcp –dport 3128 -j ACCEPT
sudo /sbin/iptables -I INPUT 1 -p tcp –dport 80 -j ACCEPT
sudo /etc/init.d/iptables save
sudo /etc/init.d/iptables restart

7. Configure SSL certificate and run squid

cd /opt/squid/etc/
/etc/squid/
ls
cd /etc/squid/
ls
mkdir ssl
cd ssl/
openssl req -new -newkey rsa:1024 -days 365 -nodes -x509 -keyout squidCA.pem -out squidCA.pem
squid start

Now on your private subnet VM http proxy will automatically work without doing any changes at client side i.e on private subnet VM . But if you want to use on ssl then you need to ‘export https_proxy=” https://squid_ip:3129‘ which will filter the request and send to destination if matches with defined rule. If on client end user unset you proxy setting then Squid will block all the request because squid is not configured for the ssl transparent proxy.  With above approach you will be able to achieve controlled access for your private subnet VM .

Tu run squid in debug mode:

squid -NCd9


Posted in AWS Cloud, Cloud Computing, J2EE technoloy, Monitoring, S3 Bucket, VPC and S3 bucket | Tagged , , , , , | 3 Comments

Monitoring and Log analysis strategies for the Dynamic world of Cloud….

Monitoring and Log analysis strategies for the Dynamic world of Cloud….

Organizations are becoming increasingly interested in leveraging cloud computing services to improve flexibility and scalability of the IT services delivered to end-users. However, organizations using cloud computing services face the following challenge: decreased visibility into the performance of services being delivered to their end-users.

Many cloud providers offer dashboards for tracking availability of their services as well as alerting capabilities for identifying service outages in a timely manner, but these capabilities are not sufficient for end-users who need to have a full control of the performance of cloud services in use. More importantly, organizations cannot rely on monitoring capabilities offered by their cloud service providers, and they need to deploy third-party solutions that allow them to monitor the performance and levels of SLA achievements of cloud services.

When software delivered, the customer is responsible for monitoring the infrastructure and the application. The customer is also responsible for capacity planning to ensure that additional infrastructure is procured and ready in time when usage reaches certain thresholds. With the cloud model, the cloud vendor must perform these tasks in real time and instantly scale the system automatically when certain thresholds are hit. The best monitoring strategy for the cloud is a proactive strategy that detects problems before they have a broad impact on the overall system and on the user experience.

There are a number of categories that should be monitored:

Availability

1. VM Availability

2. Software/Service Availability

3. Application Availability

Performance Matrices

1. Throughput

2. Response Time

 Auto scaling and Capacity Planning

User Defined metrics

Log file analysis

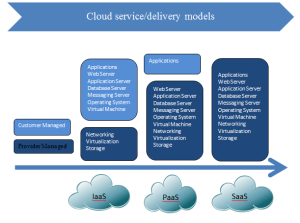
Cloud service/delivery Models

So Monitoring required for the three different layers of the cloud environment:

  • Application Layer
  • Service/Software Layer
  • Infrastructure Layer

I have been working in cloud environment from last 3-4 year. I have extensive experience in VM provisioning, application management and configuration management.  We have evaluated and used number of Application Monitoring solution and log monitoring solution. I am sharing some sharing my experience with these tools.

Paid Solution

Splunk (http://www.splunk.com/)

Splunk (the product) captures indexes and correlates real-time data in a searchable repository from which it can generate graphs, reports, alerts, dashboards and visualizations.

Splunk aims to make machine data accessible across an organization and identifies data patterns, provides metrics, diagnoses problems and provides intelligence for busiatness operation. Splunk is a horizontal technology used for application management, security and compliance, as well as business and web analytics.

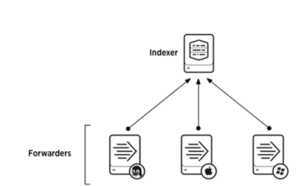
Splunk Enterprise performs three key functions as it moves data through the data pipeline.

  1. It consumes data from files, the network, or elsewhere through forwarder.
  2. Then it indexes the data through Indexer Component.
  3. Finally, it runs interactive or scheduled searches on the indexed data through a fancy Dashboard.

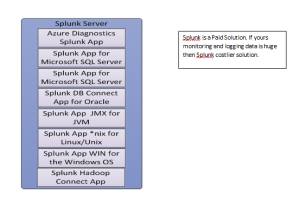
Splunk Server has various applications for the supporting it monitoring and log analysis. You can use them according to yours business needs. Following are the common applications of Splunk can be used for the monitoring IAAS and PAAS cloud provider like Azure, Rackspace, AWS and Terremark Etc..

Splunk is a Paid Solution. If yours monitoring and logging data is huge then Splunk costlier solution.


AppDynamics (http://www.appdynamics.com/)

This is very good monitoring solution for the IaaS and PaaS Provider

New Relic (http://newrelic.com/)

This is very good monitoring solution for the IaaS and PaaS Provider

Open Source Solution

Hyperic HQ Opensource version(http://www.hyperic.com/hyperic-open-source-download)

We have used hyperic as monitoring solution in our one of application it is very good in providing VM stats , VM availability and service/Software stats and software availability.

Let me first give you brief about Open source Hyperic HQ designed to provide all fundamental management and monitoring capabilities for web applications and IT infrastructures.
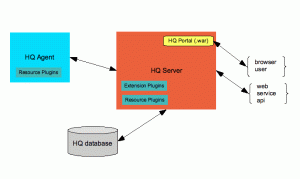
Key Facts about the HQ Architecture

This diagram is a simple illustration of the key HQ components and how they fit together. The diagram doesn’t reflect a real-world deployment, as it shows only a single HQ Agent. In a typical deployment, there are many agents – one on every machine you manage with HQ.

Logstash (http://logstash.net/)

Logstash is a tool for managing events and logs. You can use it to collect logs, parse them, and store them for later use (like, for searching). Speaking of searching, logstash comes with a web interface for searching and drilling into all of your logs.

Posted in J2EE technoloy, Monitoring | Leave a comment

Monitoring and Log analysis strategies for the Dynamic world of Cloud….

Monitoring and Log analysis strategies for the Dynamic world of Cloud….

Organizations are becoming increasingly interested in leveraging cloud computing services to improve flexibility and scalability of the IT services delivered to end-users. However, organizations using cloud computing services face the following challenge: decreased visibility into the performance of services being delivered to their end-users.

Many cloud providers offer dashboards for tracking availability of their services as well as alerting capabilities for identifying service outages in a timely manner, but these capabilities are not sufficient for end-users who need to have a full control of the performance of cloud services in use. More importantly, organizations cannot rely on monitoring capabilities offered by their cloud service providers, and they need to deploy third-party solutions that allow them to monitor the performance and levels of SLA achievements of cloud services.

When software delivered, the customer is responsible for monitoring the infrastructure and the application. The customer is also responsible for capacity planning to ensure that additional infrastructure is procured and ready in time when usage reaches certain thresholds. With the cloud model, the cloud vendor must perform these tasks in real time and instantly scale the system automatically when certain thresholds are hit. The best monitoring strategy for the cloud is a proactive strategy that detects problems before they have a broad impact on the overall system and on the user experience.

There are a number of categories that should be monitored:

Availability

1. VM Availability

2. Software/Service Availability

3. Application Availability

Performance Matrices

1. Throughput

2. Response Time

 Auto scaling and Capacity Planning

User Defined metrics

Log file analysis

Cloud service/delivery Models

Untitled

So Monitoring required for the three different layers of the cloud environment:

  • Application Layer
  • Service/Software Layer
  • Infrastructure Layer

I have been working in cloud environment from last 3-4 year. I have extensive experience in VM provisioning, application management and configuration management.  We have evaluated and used number of Application Monitoring solution and log monitoring solution. I am sharing some sharing my experience with these tools.

Paid Solution

Splunk (http://www.splunk.com/)

Splunk (the product) captures indexes and correlates real-time data in a searchable repository from which it can generate graphs, reports, alerts, dashboards and visualizations.

Splunk aims to make machine data accessible across an organization and identifies data patterns, provides metrics, diagnoses problems and provides intelligence for busiatness operation. Splunk is a horizontal technology used for application management, security and compliance, as well as business and web analytics.

Untitled

Splunk Enterprise performs three key functions as it moves data through the data pipeline.

  1. It consumes data from files, the network, or elsewhere through forwarder.
  2. Then it indexes the data through Indexer Component.
  3. Finally, it runs interactive or scheduled searches on the indexed data through a fancy Dashboard.

Splunk Server has various applications for the supporting it monitoring and log analysis. You can use them according to yours business needs. Following are the common applications of Splunk can be used for the monitoring IAAS and PAAS cloud provider like Azure, Rackspace, AWS and Terremark Etc..

Untitled

AppDynamics (http://www.appdynamics.com/)

This is very good monitoring solution for the IaaS and PaaS Provider

New Relic (http://newrelic.com/)

This is very good monitoring solution for the IaaS and PaaS Provider

 Open Source Solution

Hyperic HQ Opensource version(http://www.hyperic.com/hyperic-open-source-download)

We have used hyperic as monitoring solution in our one of application it is very good in providing VM stats , VM availability and service/Software stats and software availability.

Let me first give you brief about Open source Hyperic HQ designed to provide all fundamental management and monitoring capabilities for web applications and IT infrastructures.
Key Facts about the HQ Architecture

Hyperic HQ Architechture

This diagram is a simple illustration of the key HQ components and how they fit together. The diagram doesn’t reflect a real-world deployment, as it shows only a single HQ Agent. In a typical deployment, there are many agents – one on every machine you manage with HQ.

Logstash (http://logstash.net/)

Logstash is a tool for managing events and logs. You can use it to collect logs, parse them, and store them for later use (like, for searching). Speaking of searching, logstash comes with a web interface for searching and drilling into all of your logs.


Nagios (http://www.nagios.org/)


Posted in Cloud Computing | Tagged , , , , , | Leave a comment

Apache Cassandra monitoring through Hyperic HQ

For monitoring Cassandra through Hyperic HQ server you need to write hyperic JMX plugin as well as you need to change java opts in the Cassandra server.

Follow following steps to monitor Cassandra through hyperic HQ:

1. Modify Cassandra  server JVM opts

1.1 For linux

->For Cassandra 0.6.x

Add parameter -Dproc.java.home=$JAVA_HOME in  the file  $CASSANDRA_HOME/bin/ cassandra.in.sh

->For Cassandra 0.7.x

Add parameter -Dproc.java.home=$JAVA_HOME in  the file  $CASSANDRA_HOME/conf/cassandra-env.sh

1.2 For windows:
Add parameter -Dproc.java.home=$JAVA_HOME in  the file  $CASSANDRA_HOME/bin/cassandra.bat

Default Cassandra server JMX port is 8080. JMX port is required in the plugin config for monitoring.

2.       I assume that you have Cassandra server setup done and for example following is the details of Cassandra storage configuration.

Keyspace: test

Column family: employee

Column family: department


3.       Writing Cassandra Hyperic Plugin:

Let me give brief about Hyperic JMX Plugin: – JMX plugins target remote JMX-enabled applications. They extract metrics from the Java services via MBeans. One of the main tasks of writing a JMX plugin is determining which metrics to monitor via those MBeans. JMX plugins are templatized and so you will not need to write any Java code. All you need to do is write an XML descriptor.

For more details follow http://support.hyperic.com/display/DOC/JMX+Plugin+Tutorial


In Cassandra we usually monitor column family specific parameters. Following are the metrics of Cassandra column families those are need to monitor.

I. TotalDiskSpaceUsed

II. LiveDiskSpaceUsed

III. LiveSSTableCount

IV. PendingTasks

V. WriteCount

VI. ReadCount

VII. MemtableColumnsCount

VIII. MemtableDataSize

IX. MemtableSwitchCount

X. TotalWriteLatencyMicros

XI. TotalReadLatencyMicros


3.1 To monitor all the column families of Cassandra key space you need to make services in the Cassandra hyperic plugin for each column family. To get metrics of particular column family you need to give keyspace name and column family name to MBean ColumnFamilyStores.

Find below sample services for column families:-

<service name=” employee “>

<property name=”PROC_HOME_PROPERTY” value=”proc.java.home”/>

<plugin type=”measurement”/>

<plugin type=”autoinventory”/>

<property name=”OBJECT_NAME” value=”org.apache.cassandra.db:type=ColumnFamilyStores,keyspace=test,columnfamily=employee“/>

<metrics include=”cassandraCFMetrics”/>

</service>


<service name=” department“>

<property name=”PROC_HOME_PROPERTY” value=”proc.java.home”/>

<plugin type=”measurement”/>

<plugin type=”autoinventory”/>

<property name=”OBJECT_NAME” value=”org.apache.cassandra.db:type=ColumnFamilyStores,keyspace=test,columnfamily= department “/>

<metrics include=”cassandraCFMetrics”/>

</service>


Similar services you need to create for each column families of a keyspace of Cassandra .
Note: Replace org.apache.cassandra.db:type=ColumnFamilyStores with org.apache.cassandra.db:type=ColumnFamilies for cassandra 0.7.x for above services of column families.
4.  Download cassandra-plugin and save as cassandra-plugin.xml. Add service according to yours storage configuration of cassanda server database. And  Change JMX port in the cassandra-plugin.xml in the config section.

<option name=”jmx.url” description=”JMX URL to MBeanServer”  default=”service:jmx:rmi:///jndi/rmi://localhost:8080/jmxrmi”/>

And save the file.

5. Now deploy cassandra-plugin.xml file into the server and all agents which need to monitor the Cassandra server.

Step 1: Stop the HQ Server and Agents

Step 2: Copy the plugin file to the respective plugin directory

HQ-Server:

cp cassandra-plugin.xml <hq installation dir>/server-4.4.x/hq-engine/server/default/deploy/hq.ear/hq-plugins

HQ-Agent:

cp cassandra-plugin.xml <hq installation dir>/agent-4.4.x/pdk/plugins

Step 3: Start the HQ Server and the HQ Agents


Posted in Uncategorized | 12 Comments

GlassFishV3 Application server Monitoring with Hyperic HQ

Let me first give you brief about Open source Hyperic HQ designed to provide all fundamental management and monitoring capabilities for web applications and IT infrastructures.
Key Facts about the HQ Architecture

This diagram is a simple illustration of the key HQ components and how they fit together. The diagram doesn’t reflect a real-world deployment, as it shows only a single HQ Agent. In a typical deployment, there are many agents – one on every machine you manage with HQ.
more..
hyperic documentation

Hyperic HQ Already has Glassfish plugin but it doesn’t automatically detect Glassfish server following are the changes you need to do on in the glassfish server to get monitored with HypericHQ:-
1. Download jhall.jar from link
2. Put jhall.jar in the $GLASSFISH_HOME/glassfish/lib
3. Add following JVM parameters in the Glassfish config file $GLASSFISH_HOME//glassfish/domains/domain1/config/domain.xml in the tag <java-config>
<jvm-options>-Dcom.sun.management.jmxremote</jvm-options>
<jvm-options>-Dcom.sun.management.jmxremote.port=8686</jvm-options>
<jvm-options>-Dcom.sun.management.jmxremote.authenticate=false</jvm-options>
<jvm-options>-Dcom.sun.management.jmxremote.ssl=false</jvm-options>
<jvm-options>-Dproc.java.home=/usr/java/jdk1.6.0_22</jvm-options>
4. Now start glashfish server and hyperic agent to monitor glassfish server in the Hyperic HQ.
Stay tuned to monitor RabbitMQ and Cassandra through Hyperic HQ………………….
Wish you very -very Happy and prosperous New Year 2011 enjoy………

Posted in Uncategorized | 2 Comments

Configuring Cassandra Cluster on cloud with Load Balancer

Cloud Used: Rackspace

Load Balancer used: HAProxy

OS: Centos 5.5

Cassandra version used: apache-cassandra-0.6.5

Find below steps to cluster Cassandra through HAProxy on Rackspace Cloud:-

1.     Install HAProxy on the any node currently I am using centos 5.5

2.     Install cassandra as seed node on another machine. By default, Cassandra uses 7000 for cluster communication, 9160 for clients (Thrift), and 8080 for JMX.

3.     Change cassandra clustering configuration on seed node in the file $CASSANDRA_HOME/conf/storage-conf.xml as follows

1)   In the seed enter the IP of HAProxy Load Balancer node

<Seeds>

<Seed> HAProxy_Load_Balancer_IP</Seed>

</Seeds>

2)   Enter ip of cassandra seed node in the ListenAddress and ThriftAddress

<ListenAddress>cassandra_seed_ip</ListenAddress>

<ThriftAddress>cassandra_seed_ip</ThriftAddress>

4.     Open cassandra ports on seed node by running following commands on command prompt

iptables -I INPUT 1 -p tcp  –dport 7000 -j ACCEPT

/etc/init.d/iptables save

/etc/init.d/iptables restart

iptables -I INPUT 1 -p tcp  –dport 9160 -j ACCEPT

/etc/init.d/iptables save

/etc/init.d/iptables restart

iptables -I INPUT 1 -p tcp  –dport 8080 -j ACCEPT

/etc/init.d/iptables save

/etc/init.d/iptables restart

5.     Edit HaProxy configuration file /etc/haproxy.cfg on the HaProxy node to add Cassandra port configurations as follows

listen cassandraseed

bind *:7000

mode tcp

option tcplog

log global

balance roundrobin

clitimeout 150000

srvtimeout 150000

contimeout 30000

server server1 cassandraSeedNodeIP:7000 check

listen cassandrathrift

bind *:9160

mode tcp

option tcplog

log global

balance roundrobin

clitimeout 150000

srvtimeout 150000

contimeout 30000

server server1 cassandraSeedNodeIP:9160 check

listen cassandrajmx

bind *:8000

mode tcp

option tcplog

log global

balance roundrobin

clitimeout 150000

srvtimeout 150000

contimeout 30000

server server1 cassandraSeedNodeIP:8080 check

6.     Open ports on Haproxy node by running following commands on command prompt

iptables -I INPUT 1 -p tcp  –dport 7000 -j ACCEPT

/etc/init.d/iptables save

/etc/init.d/iptables restart

iptables -I INPUT 1 -p tcp  –dport 9160 -j ACCEPT

/etc/init.d/iptables save

/etc/init.d/iptables restart

iptables -I INPUT 1 -p tcp  –dport 8000 -j ACCEPT

/etc/init.d/iptables save

/etc/init.d/iptables restart

7.     Install cassandra as  non-seed node on another machine.

8.     Change cassandra clustering configuration on non-seed node in the file $CASSANDRA_HOME/conf/storage-conf.xml as follows

1)   In the seed enter the IP of HAProxy Load Balancer

<Seeds>

<Seed> HAProxy_Load_Balancer_IP</Seed>

</Seeds>

2)   Enter ip of cassandra non-seed node in the ListenAddress and ThriftAddress

<ListenAddress> cassandra_non-seed_ip</ListenAddress>

<ThriftAddress> cassandra_non-seed_ip</ThriftAddress>

3)   On AutoBootstrap on the non-seed-node

<AutoBootstrap>true</AutoBootstrap>

9.     Open cassandra ports on non-seed node by running following commands on command prompt

iptables -I INPUT 1 -p tcp  –dport 7000 -j ACCEPT

/etc/init.d/iptables save

/etc/init.d/iptables restart

iptables -I INPUT 1 -p tcp  –dport 9160 -j ACCEPT

/etc/init.d/iptables save

/etc/init.d/iptables restart

iptables -I INPUT 1 -p tcp  –dport 8080 -j ACCEPT

/etc/init.d/iptables save

/etc/init.d/iptables restart

10.                       Restart Start Haproxy on Haproxy node bye running following command:

/etc/init.d/haproxy restart

11.                        Start Seed Cassandra node by running following command

$CASSANDRA_HOME/bin/cassandra

12.                       Start Non-Seed Cassandra node by running following command

$CASSANDRA_HOME/bin/cassandra

That’s it your cassandra machines are cluster through HaProxy 🙂

You can verify by testing through cassandra cli. Run cassandra cli on both node by running following command and connect to their respective thrift address:

  • On Seed node run following commands:

a. $CASSANDRA_HOME/bin/cassandra-cli

b. cassandra> connect seed_ip/9160

c. cassandra> set Keyspace1.Standard1[‘IIPL-1274’][‘name’]=’Sunil Kumar’

  • On Non-Seed run following commands:

a. $CASSANDRA_HOME/bin/cassandra-cli

b. cassandra>connect non-seed_ip/9160

c. cassandra>  get Keyspace1.Standard1[‘IIPL-1274’]

output should be

=> (column=6e616d65, value=Sunil Kumar, timestamp=1288196657949000)

Returned 1 results.

cheeeeeeeeeeeeeeeeeeers:)

Posted in Uncategorized | 1 Comment

Configuring RabbitMQ Cluster on Cloud

Follow following steps to configure RabbitMQ server Cluster on Rackspace Cetos5.5–

1. Install gcc on the centos by running following commands on the command prompt
[root@RabbitMQ1 /root/] yum -y install make gcc gcc-c++ kernel-devel m4 ncurses-devel openssl-devel
2. Download Erlang source code by using following command
[root@RabbitMQ1 /root/] wget http://www.erlang.org/download/otp_src_R14B.tar.gz
3. Extract downloaded file using following command
[root@RabbitMQ1 /root/] tar -zxvf otp_src_R14B.tar.gz
4. Configure Erlang by running following command
[root@RabbitMQ1 /root/] otp_src_R14B/configure –with-ssl
5. Make and Install Erlang by running following command
[root@RabbitMQ1 /root/] otp_src_R14B/make install

6. Download RabbitMQ server by running following command
[root@RabbitMQ1 /root/] wget http://www.rabbitmq.com/releases/rabbitmq-server/v2.1.1/rabbitmq-server-generic-unix-2.1.1.tar.gz
7. Extract downloaded file using following command in the /usr/local/
8. Fix RabbitMq Erlang process port by adding -kernel inet_dist_listen_min PORT and -kernel inet_dist_listen_max PORT parameters in the file $RABBITMQ_HOME/sbin/rabbitmq-server file

SERVER_ERL_ARGS=”+K true +A30 +P 1048576 \

-kernel inet_default_listen_options  \

-kernel inet_default_connect_options [{nodelay,true}] \

-kernel inet_dist_listen_min 35197 \

-kernel inet_dist_listen_max 35197

9. Open following firewall port by running following commands on the command prompt

iptables -I INPUT 1 -p tcp –dport 5672 -j ACCEPT
iptables -I INPUT 1 -p tcp –dport 4369 -j ACCEPT
iptables -I INPUT 1 -p tcp –dport 35197 -j ACCEPT
/etc/init.d/iptables save
/etc/init.d/iptables restart

10. Follow above steps on each rabbit MQ node.
11. For communication between two nodes they must have the same cookie.
12. Cookie file exist at following location
/root/.erlang.cookie
13. Copy .erlang.cookie from master node RabbitMQNode1 the second node RabbitMQNode2 in the cluster at same location.
14. Remove directory /var/lib/rabbitmq/mnesia on each node
15. Start RabbitMQ server on both nodes by running following command from $RABBITMQ_HOME command prompt
[root@RabbitMQ1 /root/] sbin/ rabbitmq-server –detached
16. Stop RabbitMQ application on node RabbitMQNode2 by running following command from $RABBITMQ_HOME command prompt
[root@RabbitMQ1 /root/] sbin/rabbitmqctl stop_app
17. Reset the RabbitMQNode2 by running following command from $RABBITMQ_HOME command prompt
[root@RabbitMQ1 /root/] sbin/rabbitmqctl reset
18. Run following command from from $RABBITMQ_HOME command prompt at node RabbitMQNode2 to join the rabbit@ RabbitMQNode1 cluster
[root@RabbitMQ1 /root/] sbin/ rabbitmqctl cluster rabbit@RabbitMQNode1
19. Start the RabbitMQ application node RabbitMQ2 by running command from $RABBITMQ_HOME command prompt
[root@RabbitMQ1 /root/] sbin/rabbitmqctl start_app

20. To check RabbitMQ cluster status run follwong command from $RABBITMQ_HOME command prompt
[root@RabbitMQ1 /root/] rabbitmqctl status

sbin/rabbitmqctl status
Status of node rabbit@ RabbitMQNode2 …
[{running_applications,[{rabbit,”RabbitMQ”,”2.1.1″},
{mnesia,”MNESIA CXC 138 12″,”4.4.15″},
{os_mon,”CPO CXC 138 46″,”2.2.5″},
{sasl,”SASL CXC 138 11″,”2.1.9.2″},
{stdlib,”ERTS CXC 138 10″,”1.17.1″},
{kernel,”ERTS CXC 138 10″,”2.14.1″}]},
{nodes,[{disc,[rabbit@ RabbitMQNode1]}, {ram, [rabbit@ RabbitMQNode2]}]},
{running_nodes,[rabbit@ RabbitMQNode1, rabbit@ RabbitMQNode2]}]
…done.

Posted in Uncategorized | 7 Comments